Dual Boot Windows with VHDX
Playing around with dual boot installations in Windows is fun. What’s not fun is having to deal with partitions. Not only is it tricky, but it also carries the risk of data loss if not done correctly.
Fortunately, Windows can be installed inside a VHDX file. A VHDX file is a virtual disk format that can be used to store files—whether they be documents, media, or even a full Windows installation. This allows for Windows dual booting without the need to repartition your HDD/SSD.
Assuming your laptop or PC already has Windows installed and you want to add another Windows installation, here are the steps.
Step 1: Prepare the .vhdx File
- Open Disk Management (Win + X → “Disk Management”).
- Click Action → Create VHD.
- Save it to your desired location, for example,
C:\vhdx\win11.vhdx.- Choose the VHDX format if you want to install Windows 8 or newer; choose VHD for Windows 7.
- Set the disk size, ensuring it’s sufficient for the Windows installation you want.
- Choose Fixed size for better performance.
- Right-click on the newly created
.vhdxdisk, click Initialize Disk, and choose GPT if using UEFI, or MBR if using BIOS. - Right-click on the initialized disk and create a New Simple Volume. Format it as NTFS and assign your desired drive letter, for example,
V:.
Step 2: Mount the Desired Windows Installation ISO
Right-click the ISO file of the Windows operating system you want to install (it can be the same version as the one already installed, or a different one). Then select Mount. Take note of the drive letter assigned, for example, E:.
Step 3: Installation Process
The installation process is performed while the first Windows is running. This is possible thanks to the DISM tool. Here are the steps:
- Open Command Prompt as an administrator.
- Check the Windows edition you want to install from the
.isofile using:
dism /Get-ImageInfo /ImageFile:E:\sources\install.wim
- Install Windows to the
.vhdxfile you created earlier:
dism /Apply-Image /ImageFile:E:\sources\install.wim /Index:1 /ApplyDir:V:\
- Replace drive
E:with the drive letter of the mounted ISO. - Replace drive
V:with the drive letter assigned to the VHDX file.
Step 4: Add to Boot Entry
- Create a boot entry pointing to the
.vhdxfile usingbcdedit:
bcdedit /copy {current} /d "Windows 11 VHDX"
- Note the GUID (e.g.,
{xxxxxxxx-xxxx-xxxx-xxxx-xxxxxxxxxxxx}) that appears after running the command above.
- Set the device and path to be added to the boot entry:
bcdedit /set {xxxxxxxx-xxxx-xxxx-xxxx-xxxxxxxxxxxx} device vhd=[C:]\vhdx\win11.vhdx
bcdedit /set {xxxxxxxx-xxxx-xxxx-xxxx-xxxxxxxxxxxx} osdevice vhd=[C:]\vhdx\win11.vhdx
bcdedit /set {xxxxxxxx-xxxx-xxxx-xxxx-xxxxxxxxxxxx} detecthal on
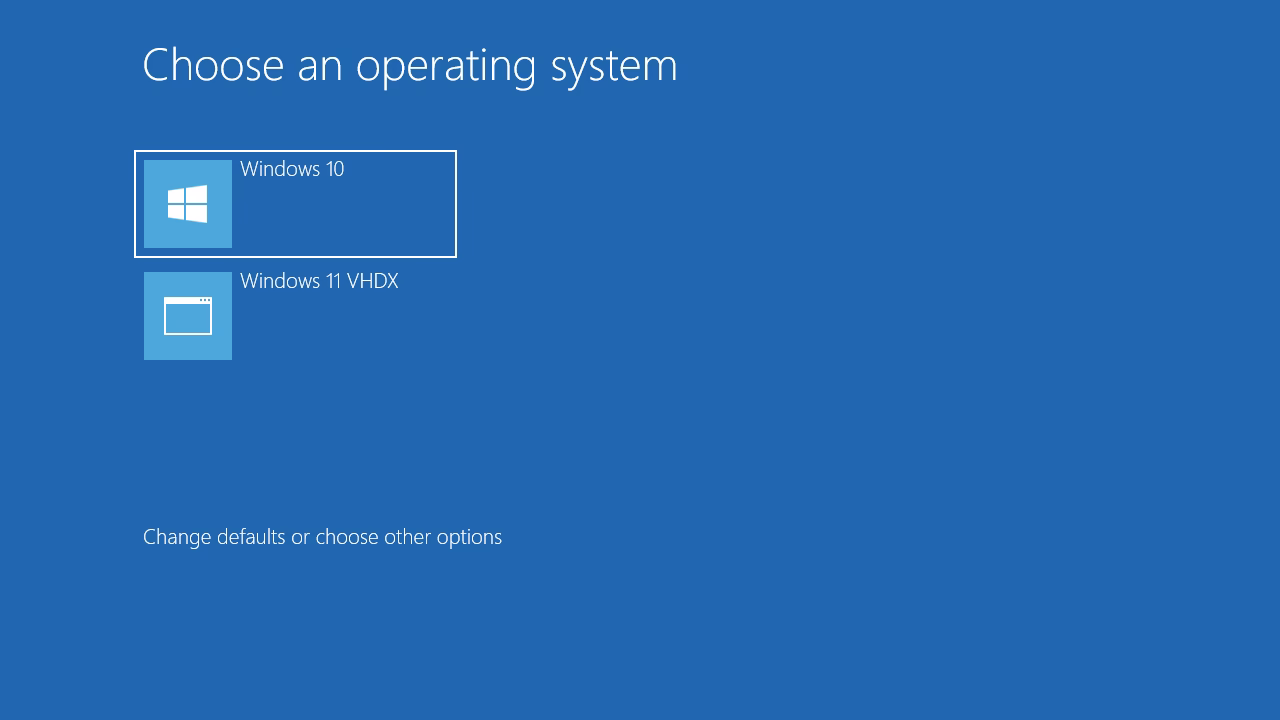
Step 5: Test Bootloader
- Restart or reboot your system.
- On the boot menu screen, select Windows 11 VHDX (or the name you chose in step 4) to boot into the new Windows installation.
Congratulations, your system now has two Windows installations. Dual booting using VHDX is perfect for:
- Those who like to experiment with different Windows versions without worrying about partitions, but want to run them on bare metal.
- Separating Windows installations for two or more purposes, such as one for personal use and another for work.
- Having fun nostalgia with older Windows versions, like Windows 7 or Windows 8.
Good luck! ~ ✨